Introduction
Email signatures are a professional way to leave your mark and provide essential contact information at the end of your emails. Microsoft Outlook, one of the most popular email clients, offers a straightforward method for creating and adding signatures to your emails. In this guide, we will walk you through the process of adding a signature in Outlook, step by step.
Step 1: Launch Microsoft Outlook
Ensure that you have Microsoft Outlook installed and configured with your email account. Launch the application and proceed to add your signature.
Step 2: Access the Signature Settings
- Once Outlook is open, click on the “File” tab in the top-left corner.
- In the File menu, select “Options.”
Step 3: Create a New Email Signature
- In the Outlook Options window, click on “Mail” on the left-hand menu.
- Scroll down until you find the “Create or modify signatures for messages” section, and then click on “Signatures.”
Step 4: Add a New Signature
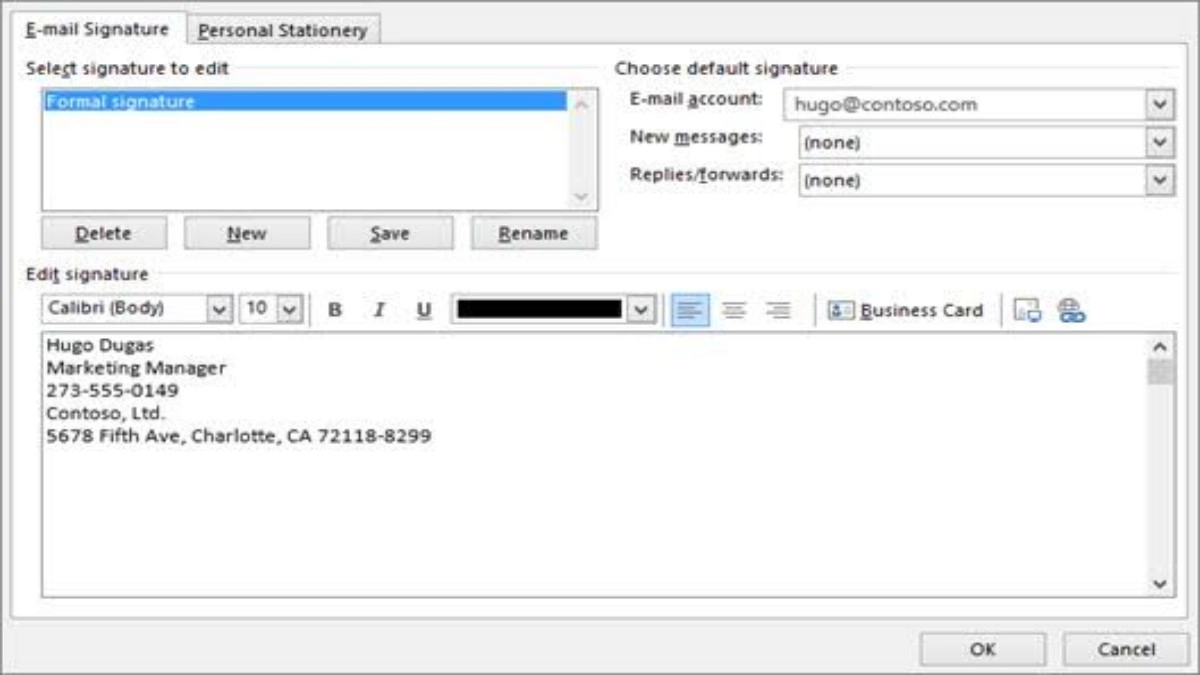
- In the Signatures and Stationery window, you’ll see the “E-mail Signature” tab. Click on “New.”
Step 5: Name Your Signature
- Give your new signature a name. This is for your reference, especially if you plan to create multiple signatures. Click “OK.”
Step 6: Compose Your Signature
- In the “Edit signature” section, you can now compose your email signature. You can include text, links, and images to create a professional and informative signature.
- You can format your signature using the toolbar at the top, similar to how you would format an email. You can change fonts, sizes, colors, and add bullets or numbering.
- Add your name, job title, company name, and contact information. You can also include social media links or any other details you deem relevant.
- To insert an image into your signature, click the image icon in the toolbar and browse your computer for the image file you want to use.
- If you wish to include a hyperlink in your signature, highlight the text you want to link and click the hyperlink icon.
- Once you’ve finished creating your signature, click “Save.”
You can read Where to Find Your Gmail Calendar and How to Use It
Step 7: Choose Default Signatures
- After saving your signature, you can set it as your default signature for new messages and replies/forwards by using the drop-down menus under “Choose default signature.”
- If you have multiple email accounts configured in Outlook, select the email account you want this signature to apply to.
- You can have different signatures for new messages and replies/forwards if needed.
Step 8: Assign Signatures for Specific Accounts
If you have multiple email accounts in Outlook and want to assign different signatures to each account, you can do so by selecting the desired account and assigning the appropriate signature.
Step 9: Apply Your Signature
Once you have created and configured your signature, click “OK” in the Signatures and Stationery window.
Step 10: Test Your Signature
To ensure your signature appears as expected, compose a new email or reply to an existing one. Your signature should automatically appear at the end of your message.
Conclusion
Adding a signature in Microsoft Outlook is a simple and effective way to leave a professional and informative mark on your emails. Whether you’re using Outlook for personal or business purposes, following the steps outlined in this guide will help you create and add your custom signature, enhancing the professional look of your emails while providing vital contact information.


